Log Database Cleanup (Web and Email)
In order to resolve the issue for Web and Email products, follow the steps below.

- Log on to the Forcepoint Security Manager (formerly Triton).
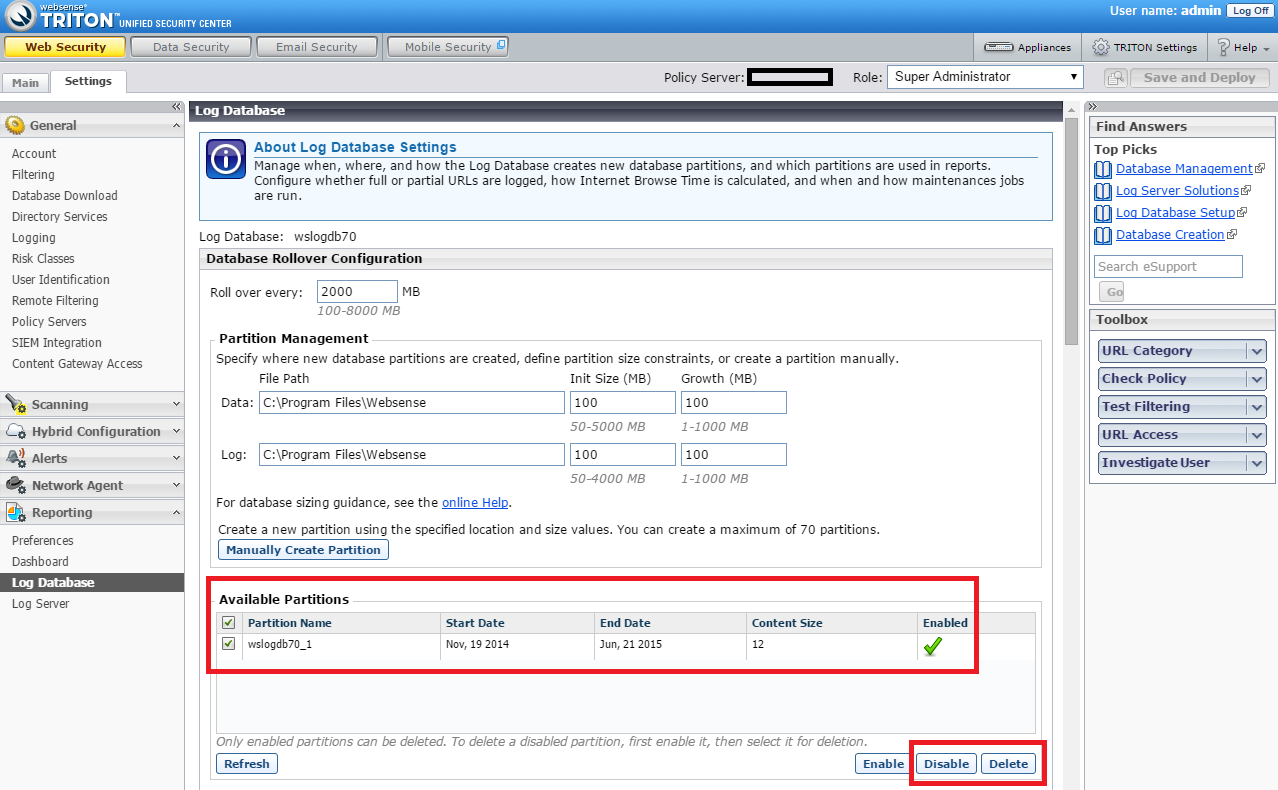
- Click Settings > Reporting > Log Database.
- Scroll down to the particular partitions you want to Delete or Disable.
- Select which partitions you wish to disable/delete by marking the checkbox to the left of each.
- Press disable/delete as per the picture below in red.
- Note If attempting to delete a Disabled partition, it must be made active again first.
- Select the Disabled partition and click the Enable button.
- Press OK, then <ol start="50">.
- Open SQL Management Studio and log in with admin credentials.
- Expand Databases > wslogdb70 (or similarly named for your database if not default). Right-click the database deleted from Forcepoint Security Manager and select Tasks > Detach.
- Select Drop Connections and Update Statistics then click OK.
- Locate the .mdf and .ldf files with the same name as the partition and delete them from the hard drive. To locate the files, check the path listed in Settings > Reporting > Log Database for Data and Log.
- In Forcepoint Security Manager, go to Settings > Reporting > Log Database.
- Navigate Database Maintenance, which is below the large graph.
- Select Automatically delete partitions when data is older than: ___ days.
- Enter the Data Retention policy day amount for your organization.
- Press OK, then Save and Deploy.
- On the next maintenance task run, any partitions with the last file matching the day after the set date will be removed.
Related Articles
Determining the SQL Database Location for Forcepoint Components
Summary Describes options for finding the SQL server connection details from the Forcepoint Management Server. Problem While troubleshooting an issue, Technical Support may request to investigate the SQL database of a Forcepoint product. If the ...Registering Email Appliances with Data Security fails
Summary For registration to work, check password and ports between Forcepoint Email Security Manager Server and Email Security Gateway. Notes and Warnings Once Data Security has successfully registered, Forcepoint Email Security Gateway will start ...More than 100 files in the Log Server cache directory
Normally, Log Server ODBC cache files or BCP files are moved to the Log Database at a steady rate. If temporary files are accumulating on the Log Server machine, current Internet usage information is not being sent to the Log Database and, with ...How to Manually Update the Secure SD-WAN Engine Antimalware Database
Summary This article provides instructions for manually updating the FlexEdge Secure SD-WAN Engine (previously NGFW) anti-malware definitions Notes and Warnings Note Due to known issue NGFW-33868, avdbfetch does not find the update file placed under ...DLP System Log: The forensics repository (or incident archive) reached xxx% from its maximum capacity
Summary Details troubleshooting steps to take when the Forensics Repository or Archival folder approaches or surpasses its configured limit. Problem The Forcepoint DLP System Log reports warnings such as the following: The Incident Archive has ...